Add apps
Adding apps to XenMobile provides mobile application management (MAM) capabilities. XenMobile assists with application delivery, software licensing, configuration, and application life cycle management.
MDX-enabling apps is an important part of preparing most types of apps for distribution to user devices. For an introduction to MDX, see About the MDX Toolkit and MAM SDK overview.
- Citrix recommends use of the MAM SDK to MDX-enable apps. Or, you can continue to MDX-wrap apps until the MDX Toolkit is deprecated. See Deprecation.
- You cannot use the MDX Toolkit to wrap Citrix mobile productivity apps. Get the mobile productivity app MDX files from Citrix downloads.
When you add apps to the XenMobile console, you:
- Configure app settings
- Optionally arrange apps into categories to organize them in Secure Hub
- Optionally define workflows to require approval before allowing users to access an app
- Deploy apps to users
This article covers the general workflows for adding apps. See the following articles for platform specifics:
- Distribute Android Enterprise apps
- Distribute Apple apps
App types and features
The following table summarizes the types of apps that you can deploy with XenMobile.
| App type | Sources | Notes | See |
|---|
| MDX | iOS and Android apps you develop for your users. Citrix mobile productivity apps. | Develop iOS or Android apps with the MAM SDK or wrap them with the MDX Toolkit. For the mobile productivity apps, download the public-store MDX files from Citrix downloads. Then, add the apps to XenMobile. | Add an MDX app |
| Public app store | Free or paid apps from public app stores such as Google Play or the Apple App Store. | Upload the apps, MDX-enable the apps, then add the apps to XenMobile. | Add a public app store app |
| Web and SaaS | Your internal network (web apps) or a public network (SaaS). | Citrix Workspace provides mobile single sign-on to native SaaS apps from iOS and Android devices enrolled in MDM. Or, use Security Assertion Markup Language (SAML) application connectors | Add a Web or SaaS app |
| Enterprise | Private apps, including Win 32 apps, that aren’t MDX-enabled. Private Android Enterprise apps that are MDX-enabled. Enterprise apps reside in Content Delivery Network locations or XenMobile Servers. | Add the apps to XenMobile. | Add an enterprise app |
| Web link | Internet web addresses, intranet web addresses, or web apps that don’t require a single sign-on. | Configure web links in XenMobile. | Add a Web link |
When planning app distribution, consider these features:
- About silent installations
- About required and optional apps
- About app categories
- Enable Microsoft 365 apps
- Apply workflows
- App store and Citrix Secure Hub branding
About silent installations
Citrix supports the silent installation and upgrade of iOS, Android Enterprise, and Samsung apps. Silent installation means that users are not prompted to install apps that you deploy to the device. The apps install automatically in the background.
Prerequisites to implement silent installation:
- For iOS, put the managed iOS device in supervised mode. For details, see the Import iOS & macOS Profile device policy.
- For Android Enterprise, the apps install in the Android work profile on the device. For details, see Android Enterprise.
- For Samsung devices, enable Samsung Knox on the device. To do so, you set the Samsung MDM license key device policy to generate Samsung ELM and Knox license keys. For details, see Samsung MDM license key device policies.
About required and optional apps
When you add apps to a delivery group, you choose whether they are optional or required. Citrix recommends deploying apps as Required.
- Required apps install silently on user devices, minimizing interaction. Having this feature enabled also allows apps to update automatically.
- Optional apps allow users to choose what apps to install, but users must initiate the installation manually through the Secure Hub.
For apps marked as required, users can promptly receive updates in situations such as:
- You upload a new app and mark it as required.
- You mark an existing app as required.
- A user deletes a required app.
- A Secure Hub update is available.
Requirements for forced deployment of required apps
- XenMobile Server 10.6 (minimum version)
- Secure Hub 10.5.15 for iOS and 10.5.20 for Android (minimum versions)
- MAM SDK or MDX Toolkit 10.6 (minimum version)
- Custom server property, force.server.push.required.apps The forced deployment of required apps is disabled by default. To enable the feature, create a Custom Key server property. Set the Key and Display name to force.server.push.required.apps and set the Value to true.
- After you upgrade XenMobile Server and Secure Hub: Users with enrolled devices must sign off and then sign-in to Secure Hub, one time, to obtain the required app deployment updates.
Examples
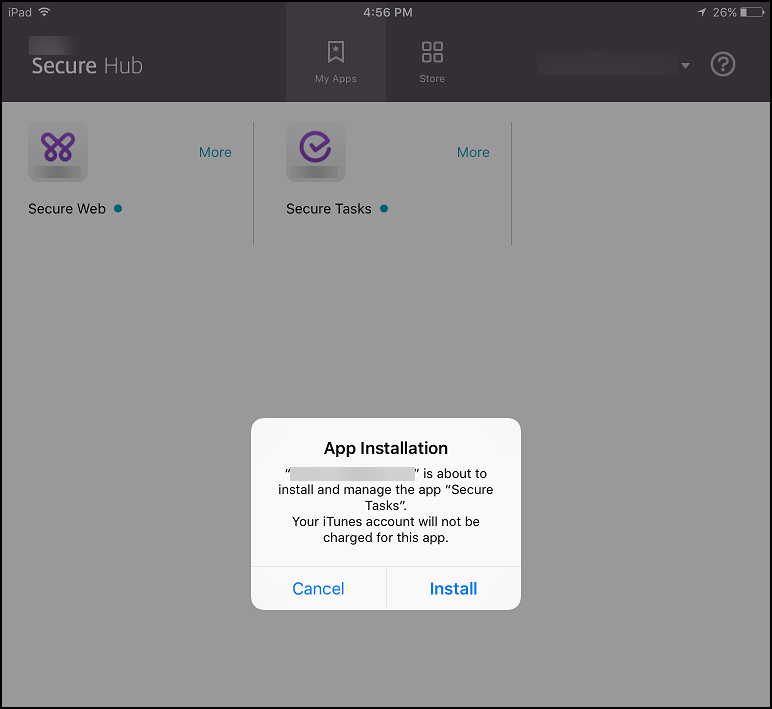
The following examples show the sequence of adding an app named Citrix Secure Tasks to a delivery group and then deploying the delivery group.
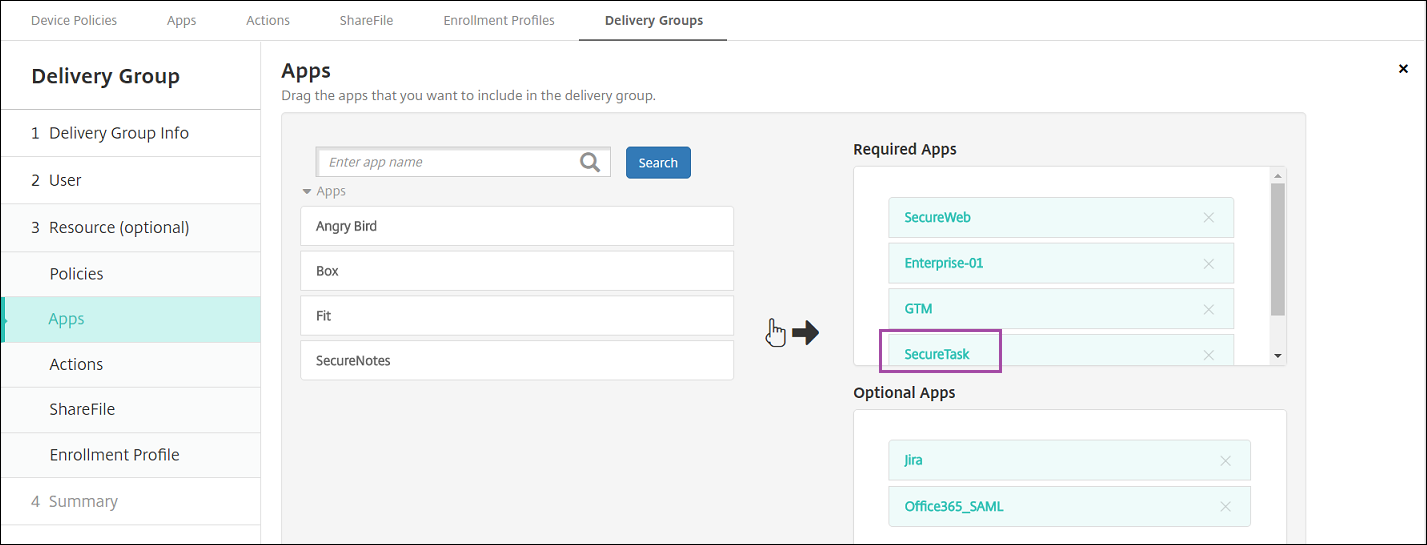

After the sample app, Citrix Secure Tasks, deploys to the user device, Secure Hub prompts the user to install the app.

Important:
MDX-enabled required apps, including enterprise apps and public app store apps, upgrade immediately. The upgrade occurs even if you configure an MDX policy for an app update grace period and the user chooses to upgrade the app later.
iOS required app workflow for enterprise and public store apps
- Deploy the XenMobile App during initial enrollment. The required app is installed on the device.
- Update the app on the XenMobile console.
- Use the XenMobile console to deploy the required apps.
- The app on the home screen is updated. And, for public store apps, the upgrade starts automatically. Users are not prompted to update.
- Users open the app from the home screen. Apps upgrade immediately even if you set an App update grace period and the user taps to upgrade the app later.
Android required app workflow for enterprise apps
- Deploy the XenMobile App during initial enrollment. The required app is installed on the device.
- Use the XenMobile console to deploy the required apps.
- The app is upgraded. (Nexus devices prompt for install updates, but Samsung devices do a silent install.)
- Users open the app from the home screen. Apps upgrade immediately even if you set an App update grace period and the user taps to upgrade the app later. (Samsung devices do a silent install.)
Android required app workflow for public store apps
- Deploy XenMobile App during initial enrollment. The required app is installed on the device.
- Update the app on the XenMobile console.
- Use the XenMobile console to deploy the required apps. Or, open the Secure Hub Store on the device. The update icon appears in the store.
- App upgrade starts automatically. (Nexus devices prompt users to install the update.)
- Open the app on the home screen. The app is upgraded. Users are not prompted for a grace period. (Samsung devices do a silent install.)
Uninstall an app when the app is configured as required
You can allow users to uninstall an app that is configured as required. Go to Configure > Delivery Groups and move the app from Required Apps to Optional Apps.
Recommended: Use a special delivery group to temporarily change an app to optional, so that specific users can uninstall the app. You can then change an existing required app to optional, deploy the app to that delivery group, and then uninstall the app from those devices. After that, if you want future enrollments for that delivery group to require the app, you can set the app back to required.
Organize apps (Android Enterprise)
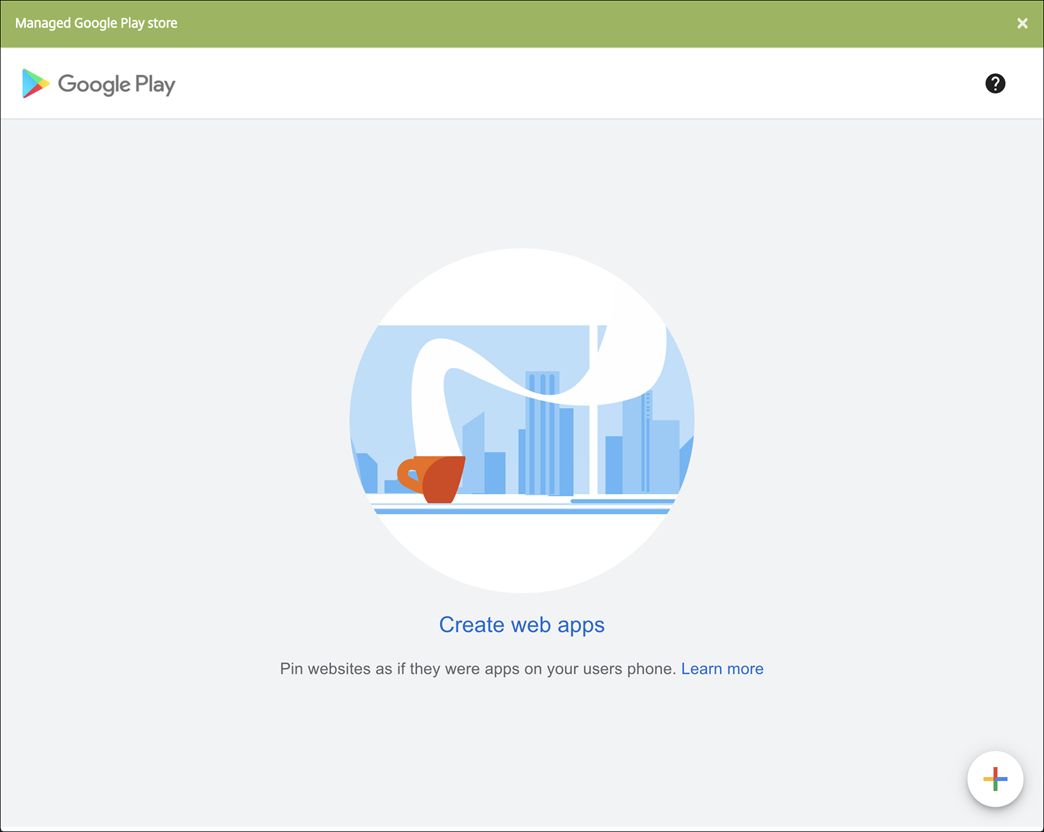
When users log on to Secure Hub, they receive a list of the apps, web links, and stores that you set up in the XenMobile Server. In Android Enterprise, you can organize these apps into collections to let users access only certain apps, stores, or web links. For example, you create a Finance collection and then add apps to the collection that only pertain to finance. Or, you can configure a Sales collection to which you assign sales apps.
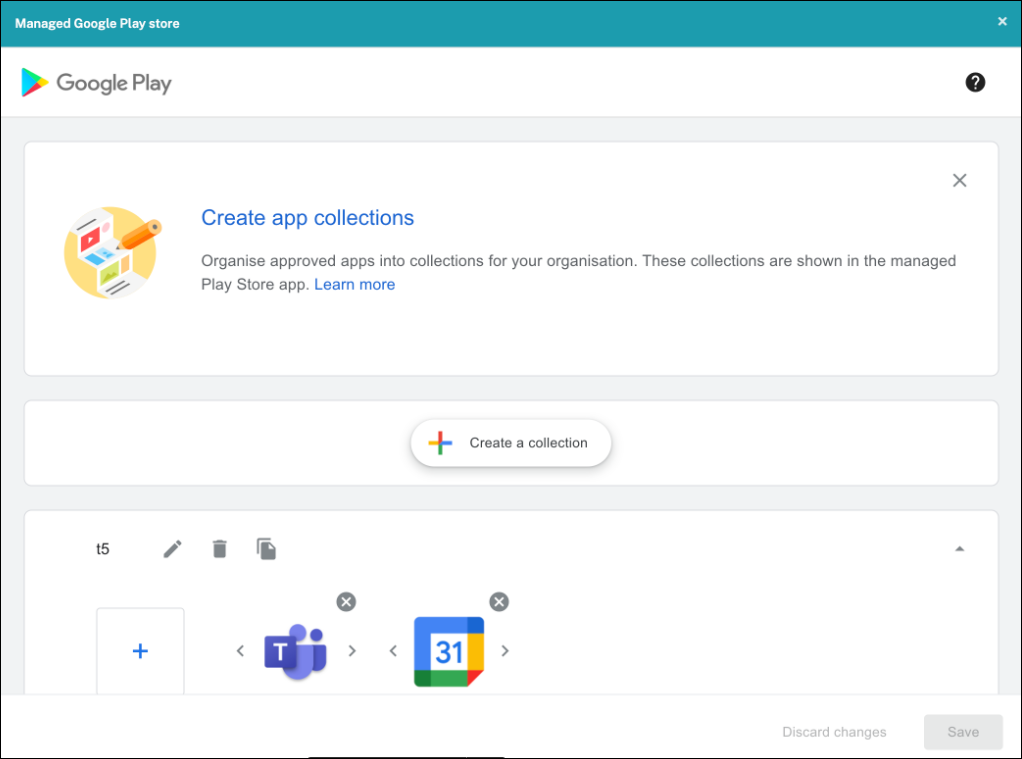
- On the XenMobile Server console, click Configure > Apps > Organize Apps. The Managed Google Play store window appears.
- Click Create a collection and select the apps to be added to that collection.
- Click Save when you’re done adding collections.
Note:
IT admins need to approve an app before it can be added to a collection on the Managed Google Play window. An IT admin can approve an app by going to https://play.google.com/work. In a future release, you will not need to approve an app before adding it to a collection.
About app categories
When users log on to Secure Hub, they receive a list of the apps, web links, and stores that you set up in XenMobile. You can use app categories to let users access only certain apps, stores, or web links. For example, you can create a Finance category and then add apps to the category that only pertain to finance. Or, you can configure a Sales category to which you assign sales apps.
When you add or edit an app, web link, or store, you can add the app to one or more of the configured categories.
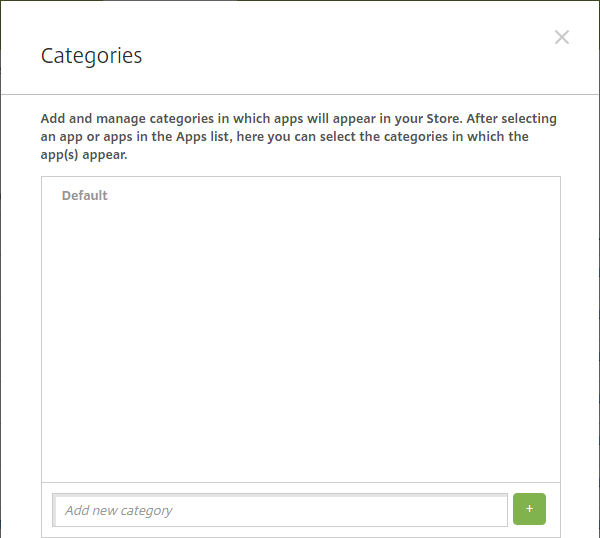
- In the XenMobile console, click Configure > Apps > Category. The Categories dialog box appears.
- For each category you want to add, do the following:
- Type the name of the category that you want to add in the Add a new category field at the bottom of the dialog box. For example, you might type Enterprise Apps to create a category for enterprise apps.
- Click the plus sign (+) to add the category. The newly created category is added and appears in the Categories dialog box.
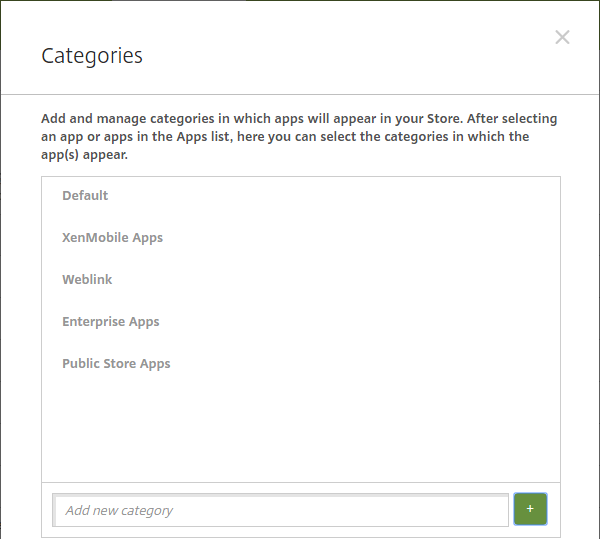
- Select the app that you want to categorize.
- Click Edit. The App Information page appears.
- In the App category list, apply the new category by selecting the category checkbox. Clear the checkboxes for any existing categories that you don’t want to apply to the app.
- Click the Delivery Groups Assignments tab or click Next on each of the following pages to step through the remaining app set-up pages.
- Click Save on the Delivery Groups Assignments page to apply the new category. The new category is applied to the app and appears in the Apps table.
Add an MDX app
When you receive an MDX file for an iOS or Android app, you can upload the app to XenMobile. After you upload the app, you can configure app details and policy settings. For more information about the app policies that are available for each device platform type, see:
- MAM SDK overview
- MDX Policies at a Glance
In the XenMobile console, click Configure > Apps. The Apps page appears.  Click Add. The Add App dialog box appears.
 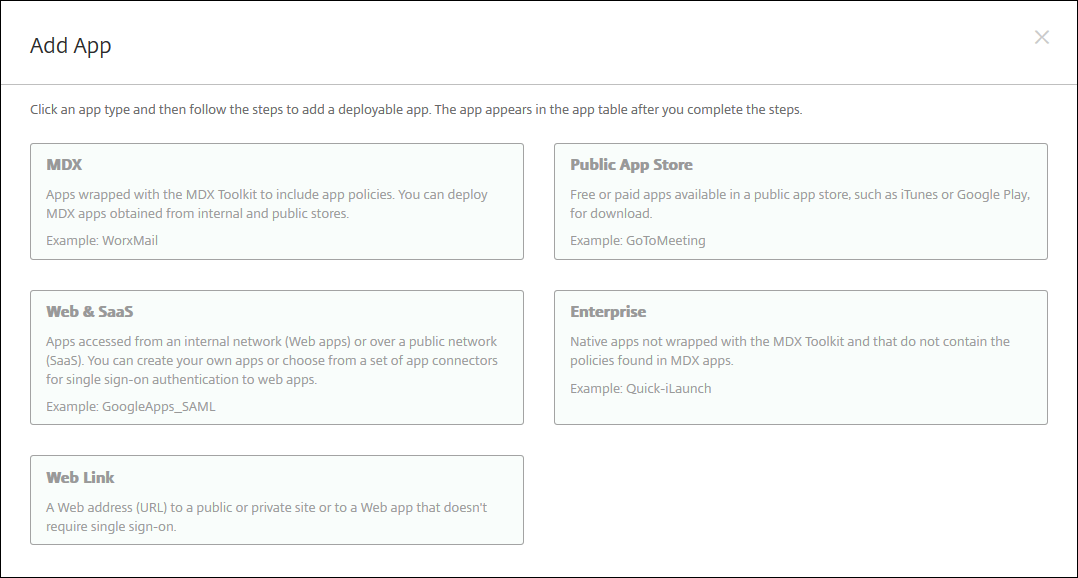 Click MDX. The MDX App Information page appears.
On the App Information pane, type the following information:
- Name: Type a descriptive name for the app. The name appears under App Name on the Apps table.
- Description: Type an optional description of the app.
- App category: Optionally, in the list, click the category to which you want to add the app. For more information about app categories, see About app categories.
Click Next. The App Platforms page appears.
Under Platforms, select the platforms you want to add. If you are only configuring for one platform, clear the others.
To select an MDX file to upload, click Upload and navigate to the file location.
In the App details page, configure these settings:
- File name: Type the file name associated with the app.
- App Description: Type a description for the app.
- App version: Optionally, type the app version number.
- Package ID: Type the package ID for the app, obtained from the managed Google Play Store.
- Minimum OS version: Optionally, type the oldest operating system version that the device can run to use the app.
- Maximum OS version: Optionally, type the most recent operating system that the device must run to use the app.
- Excluded devices: Optionally, type the manufacturer or models of devices that cannot run the app.
- Remove app if MDM profile is removed: Select whether to remove the app from an iOS device when the MDM profile is removed. The default is On.
- Prevent app data backup: Select whether to prevent users from backing up app data on iOS devices. The default is On.
- Product track: Specify which product track that you want to push to iOS devices. If you have a track designed for testing, you can select and assign it to your users. The default is Production.
- Force app to be managed: For an app that installs as unmanaged, select whether to prompt users to allow the app to be managed on unsupervised iOS devices. The default is On.
- App deployed via volume purchase: Select whether to deploy the app by using Apple volume purchase. If On, and you deploy an MDX version of the app and use volume purchase to deploy the app, Secure Hub shows only the volume purchase instance. Default is Off.
Configure the MDX Policies. MDX policies vary by platform and include options for such policy areas as authentication, device security, and app restrictions. In the console, each of the policies has a tooltip that describes the policy.
Configure the deployment rules. For information, see Deployment rules.
Expand Store Configuration. 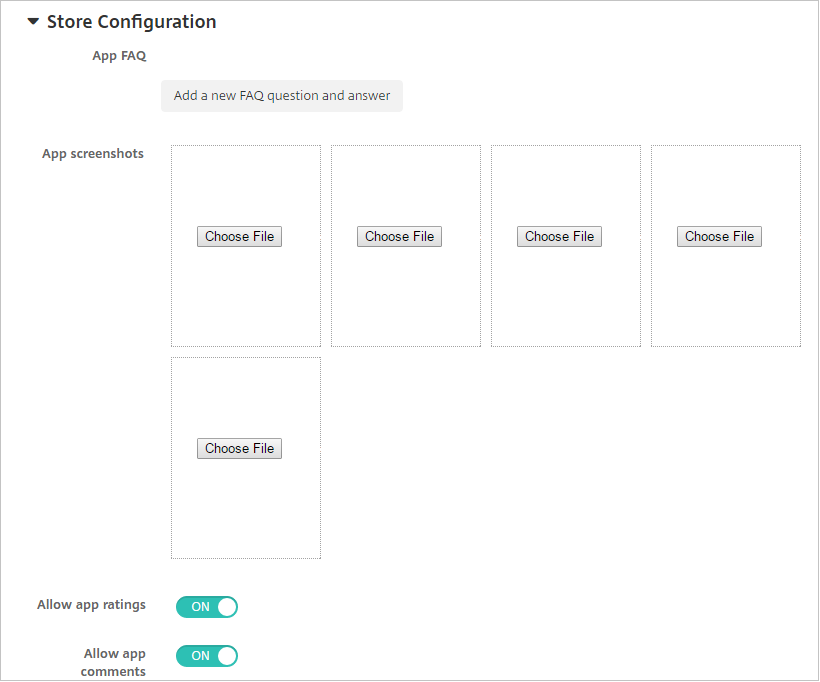
- App FAQ: Click Add a new FAQ question and answer to create a FAQ for the app.
- Add screenshots for phones/tablets: Add screen captures that appear in the app store.
- Allow app ratings: Allow users to rate the app in the app store.
- Allow app comments: Allow users to leave comments on the app in the app store.
Click Next. The Approvals page appears. 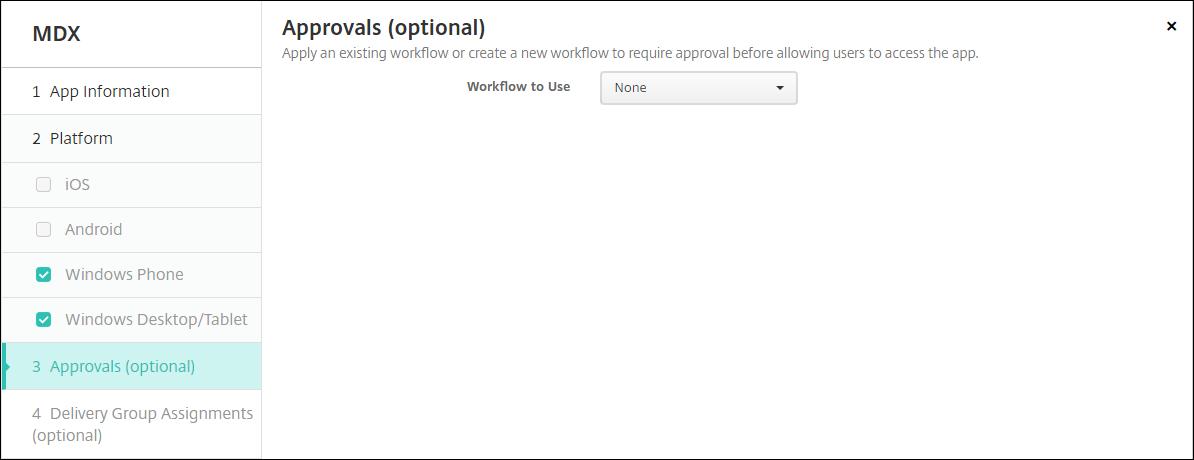 To use workflows to require approval before allowing users to access the app, see Apply workflows. If you don’t want to set up approval workflows, continue with the next step.
Click Next. The Delivery Group Assignment page appears.
 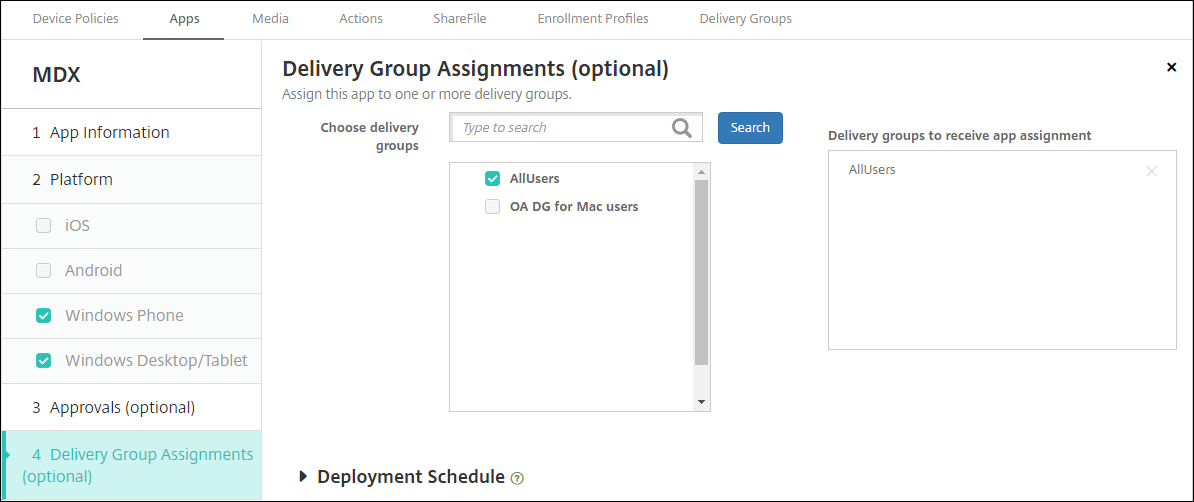 Next to Choose delivery groups, type to find a delivery group or select a group or groups in the list. The groups you select appear in the Delivery groups to receive app assignment list.
Expand Deployment Schedule and then configure the following settings:
- Deploy: Choose whether to deploy the app to devices. The default is On.
- Deployment schedule: Choose whether to deploy the app Now or Later. If you select Later, configure a date and time to deploy the app. The default is Now.
- Deployment condition: Choose On every connection to deploy the app every time the device connects. Choose Only when previous deployment has failed to deploy the app when the device failed to receive the app previously. The default is On every connection.
The Deploy for always-on connection option applies when you have configured the scheduling background deployment key in Settings > Server Properties.
The deployment schedule that you configure is the same for all platforms. Any changes you make apply to all platforms, except for Deploy for always-on connection.
Add a public app store app
You can add free or paid apps to XenMobile that are available in a public app store, such as the Apple App Store or Google Play.
You can configure settings to retrieve app names and descriptions from the Apple App Store. When you retrieve the app information from the store, XenMobile overwrites the existing name and description. Manually configure Google Play store app information.
When you add a paid public app store app for Android Enterprise, you can review the Bulk Purchase licensing status. That status is the total number of licenses available, the number currently in use, and the email address of each user consuming the licenses. The Bulk Purchase plan for Android Enterprise simplifies the process of finding, buying, and distributing apps and other data in bulk for an organization.
Configure app information and choose platforms to deliver the app to:

- In the XenMobile console, click Configure > Apps > Add. The Add App dialog box appears.
- Click Public App Store. The App Information page appears.
- On the App Information pane, type the following information:
- Name: Type a descriptive name for the app. This name appears under App Name on the Apps table.
- Description: Type an optional description of the app.
- App category: Optionally, in the list, click the category to which you want to add the app. For more information about app categories, see About app categories.
- Click Next. The App Platforms page appears.
- Under Platforms, select the platforms you want to add. If you are only configuring for one platform, clear the others.
Next you configure the app settings for each platform. See:
- Configure app settings for Google Play apps
- Managed app store apps
- Configure app settings for iOS apps
When you finish configuring the settings for a platform, set the platform deployment rules and app store configuration.

- Configure the deployment rules. For information, see Deployment rules.
- Expand Store Configuration.
- App FAQ: Click Add a new FAQ question and answer to create a FAQ for the app.
- Add screenshots for phones/tablets: Add screen captures that appear in the app store.
- Allow app ratings: Allow users to rate the app in the app store.
- Allow app comments: Allow users to leave comments on the app in the app store.
Configure app settings for Google Play apps
Note:
To make all apps in the Google Play store accessible from managed Google Play, use the XenMobile Server property Access all apps in the managed Google Play store. See Server properties. Setting this property to true allows the public Google Play store apps for all Android Enterprise users. You can then use the Restrictions device policy to control access to these apps.
Configuring settings Google Play store apps requires different steps than apps for other platforms. You must manually configure the Google Play store app information.
- Ensure that Google Play is selected under Platforms.
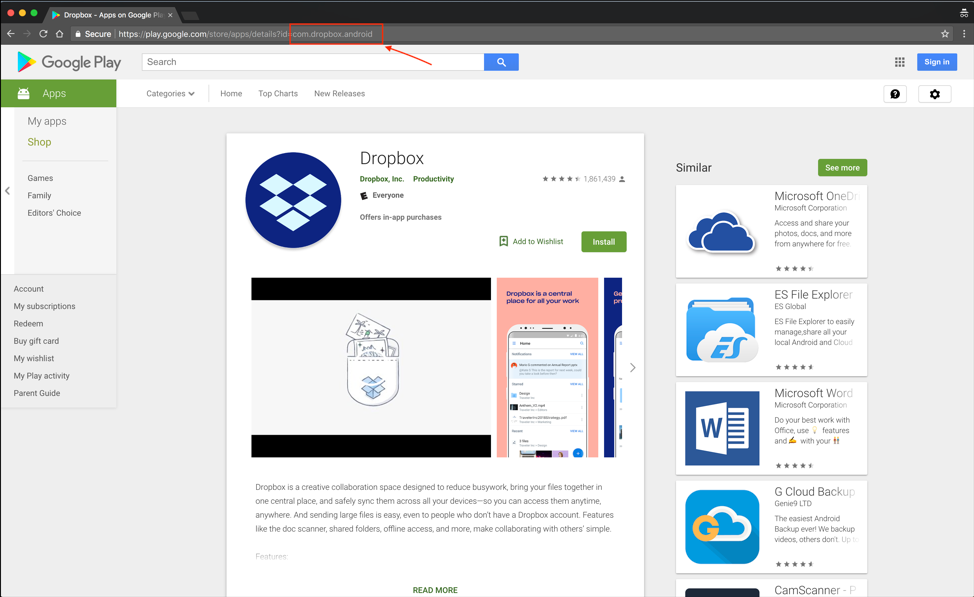
- Go to the Google Play store. From the Google Play store, copy the package ID. The ID can be found in the URL of the app.
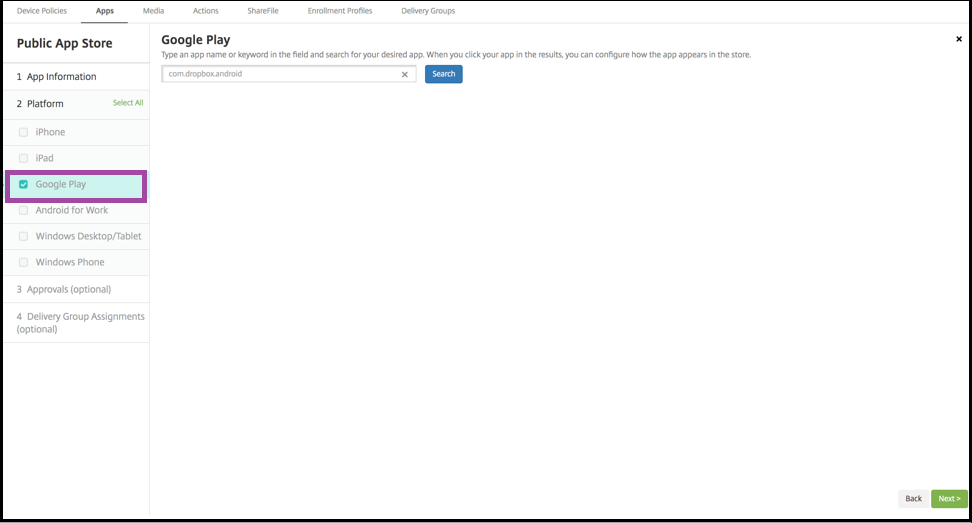
- When adding a Public Store app in the XenMobile Server console, paste the package ID in the search bar. Click Search.
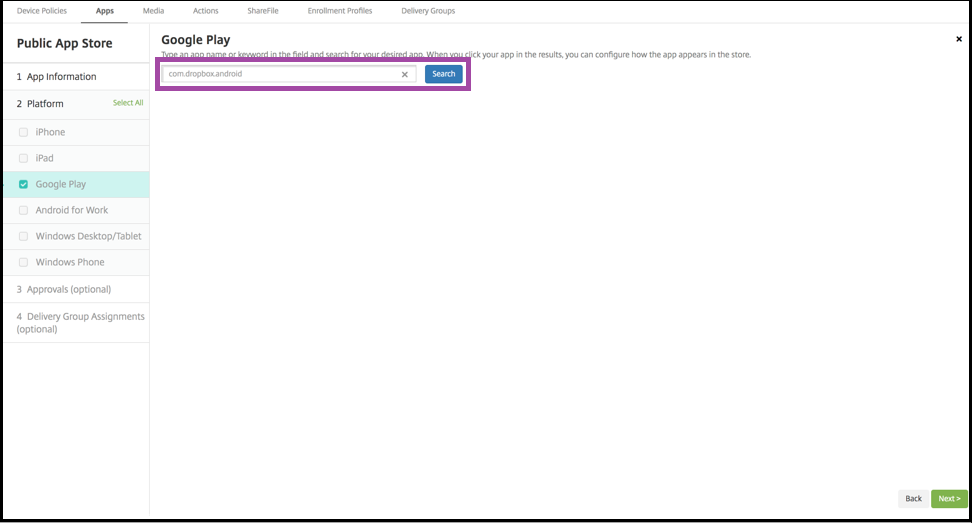
- If the package ID is valid, a UI appears allowing you to enter app details.
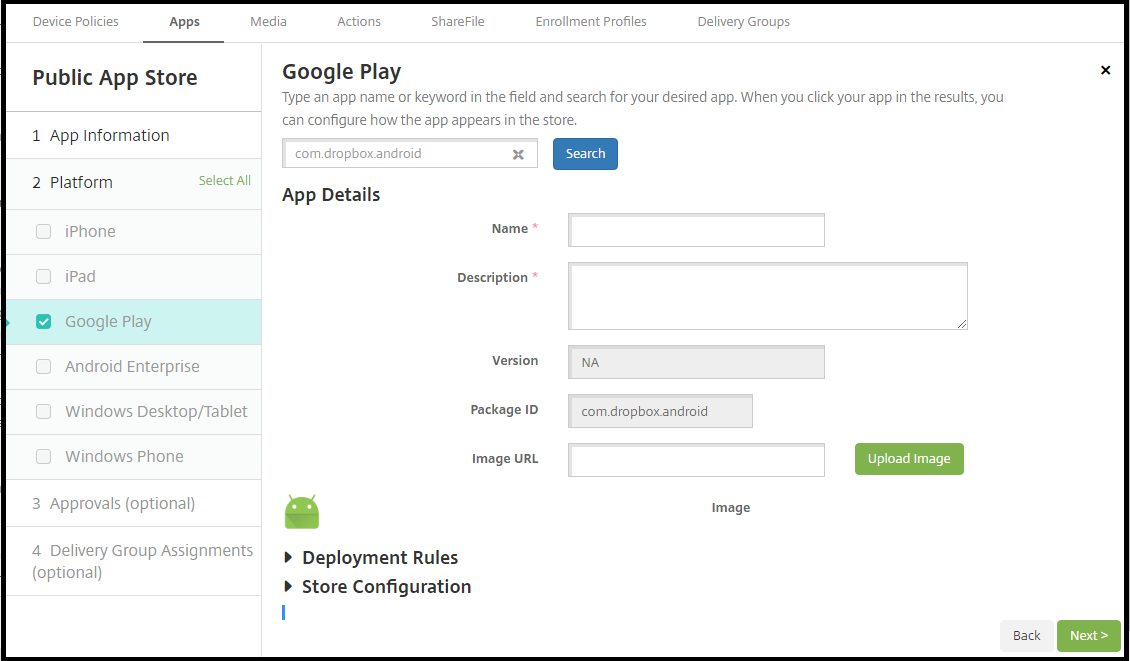
- You can configure the URL for the image to appear with the app in the store. To use the image from the Google Play store:
- Go the Google Play store. Right-click the app image and copy the image address.
- Paste the image address into the Image URL field.
- Click Upload image. The image appears beside Image.
If you don’t configure an image, the generic Android image appears with the app.
Configure app settings for iOS apps
- Type the app name in the search box and click Search. Apps matching the search criteria appear. Apps matching the search criteria appear. The following figure shows the result of searching for podio in apps on an iPhone.
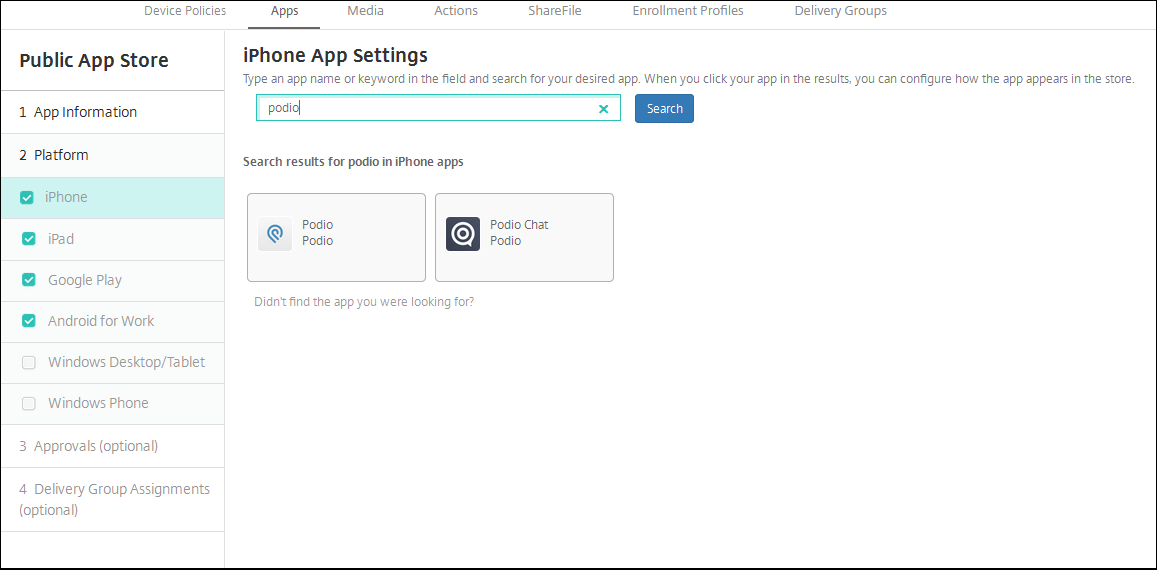
- Click the app that you want to add.
- The App Details fields pre-populate with information related to the chosen app (including the name, description, version number, and associated image).
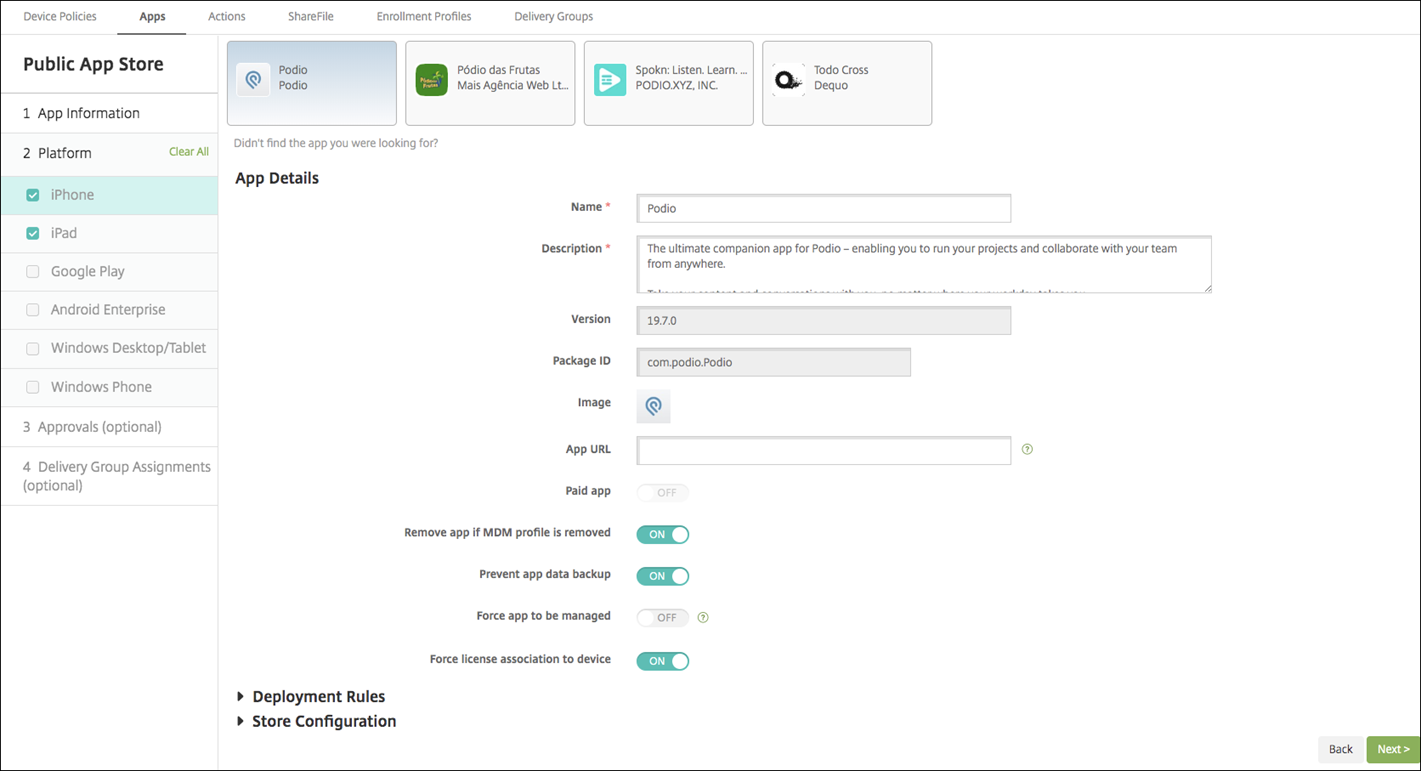
- Configure the settings:
- If necessary, change the name and description for the app.
- Paid app: This field is preconfigured and cannot be changed.
- Remove app if MDM profile is removed: Select whether to remove the app if the MDM profile is removed. The default is ON.
- Prevent app data backup: Select whether to prevent the app from backing up data. The default is ON.
- Product track: Specify which product track that you want to push to user devices. If you have a track designed for testing, you can select and assign it to your users. The default is Production.
- Force app to be managed: Select whether, when the app is installed unmanaged, to prompt users to allow the app to be managed on unsupervised devices. The default is OFF. Available in iOS 9.0 and later.
- Force license to association to device: Select whether to associate an app that has been developed with device association enabled to a device rather than to a user. Available in iOS 9 and later. If the app you chose does not support assignment to a device, this field can’t be changed.
- Configure the deployment rules. For information, see Deployment rules.
- Expand Store Configuration.

- App FAQ: Click Add a new FAQ question and answer to create a FAQ for the app.
- Add screenshots for phones/tablets: Add screen captures that appear in the app store.
- Allow app ratings: Allow users to rate the app in the app store.
- Allow app comments: Allow users to leave comments on the app in the app store.
- For iPhone or iPad, expand Volume Purchase.
- To enable XenMobile to apply a volume purchase license for the app: In the Volume purchase license list, click Upload a volume purchase license.
- In the dialog box that appears, import the license. The License Assignment table shows the number of licenses in use for the app, out of the total licenses available. You can disassociate Volume Purchase licenses for an individual user. Doing so ends the license assignments and frees licenses.
- For Android Enterprise, expand the Bulk Purchase section. The License Assignment table shows the number of licenses in use for the app, out of the total licenses available. You can select a user and then click Disassociate to end their license assignment and free a license for another user. You can only disassociate the license, however, if the user is not part of a delivery group that contains the specific app.

- After you complete the Volume Purchase or Bulk Purchase settings, click Next. The Approvals page appears. To use workflows to require approval before allowing users to access the app, see Apply workflows. If you don’t need approval workflows, continue with the next step.
- Click Next. The Delivery Group Assignment page appears.
- Next to Choose delivery groups, type to find a delivery group or select a group or groups in the list. The groups you select appear in the Delivery groups to receive app assignment list.
- Expand Deployment Schedule and then configure the following settings:
- Deploy: Choose whether to deploy the app to devices. The default is On.
- Deployment schedule: Choose whether to deploy the app Now or Later. If you select Later, configure a date and time to deploy the app. The default is Now.
- Deployment condition: Choose On every connection to deploy the app every time the device connects. Choose Only when previous deployment has failed to deploy the app when the device failed to receive the app previously. The default is On every connection.
The Deploy for always-on connection applies when you have configured the scheduling background deployment key in Settings > Server Properties.
The deployment schedule that you configure is the same for all platforms. Any changes you make apply to all platforms, except for Deploy for always-on connection.
Add a Web or SaaS app
Using the XenMobile console, you can give users single sign-on (SSO) authorization to your mobile, enterprise, web, and SaaS apps. You can enable apps for SSO by using application connector templates. For a list of connector types available in XenMobile, see Application connector types. You can also you build your own connector in XenMobile when you add a Web or SaaS app.
If an app is available for SSO only: After you save the settings, the app appears on the Apps tab in the XenMobile console.
- In the XenMobile console, click Configure > Apps > Add. The Add App dialog box appears.

- Click Web & SaaS. The App Information page appears.
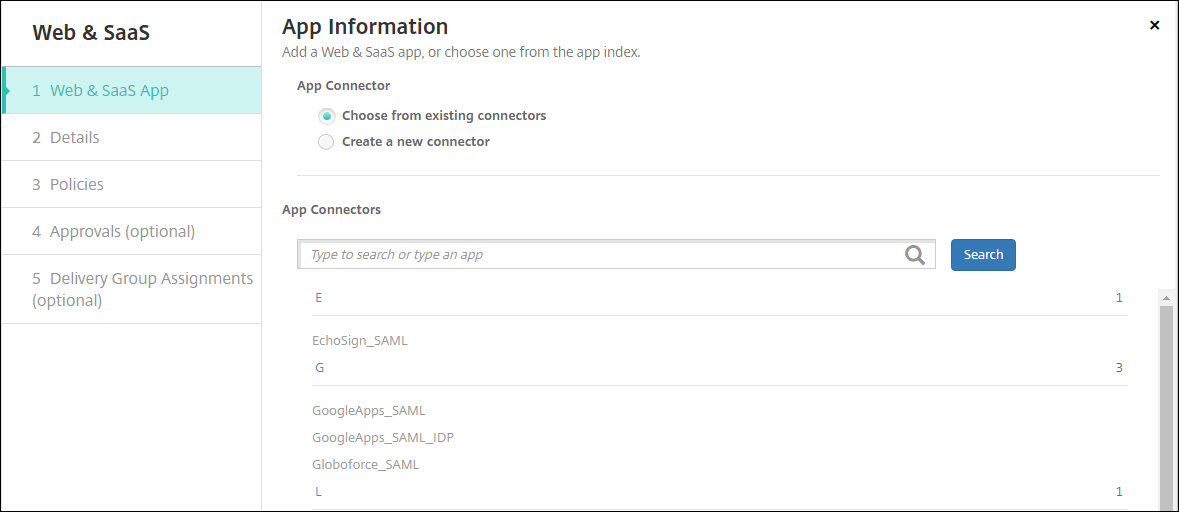
- Configure an existing or new app connector as follows.
To configure an existing app connector
- In the App Information page, Choose from existing connectors is already selected, as shown previously. Click the connector that you want to use in the App Connectors list. The app connector information appears.
- Configure these settings:
- App name: Accept the pre-filled name or type a new name.
- App description: Accept the pre-filled description or type one of your own.
- URL: Accept the pre-filled URL or type the web address for the app. Depending on the connector you choose, this field may contain a placeholder that you must replace before you can move to the next page.
- Domain name: If applicable, type the domain name of the app. This field is required.
- App is hosted in internal network: Select whether the app is running on a server in your internal network. If users connect from a remote location to the internal app, they must connect through Citrix Gateway. Setting this option to ON adds the VPN keyword to the app and allows users to connect through Citrix Gateway. The default is OFF.
- App category: In the list, click an optional category to apply to the app.
- User account provisioning: Select whether to create user accounts for the application. If you use the Globoforce_SAML connector, you must enable this option to ensure seamless SSO integration.
- If you enable User account provisioning, configure these settings:
- Service Account
- User name: Type the name of the app administrator. This field is required.
- Password: Type the app administrator password. This field is required.
- User Account
- When user entitlement ends: In the list, click the action to take when users are no longer allowed access to the app. The default is Disable account.
- User Name Rule
- For each user name rule you want to add, do the following:
- User attributes: In the list, click the user attribute to add to the rule.
- Length (characters): In the list, click the number of characters from the user attribute to use in the user name rule. The default is All.
- Rule: Each user attribute you add is automatically appended to the user name rule.
- Password Requirement
- Length: Type the minimum user password length. The default is 8.
- Password Expiration
- Validity (days): Type the number of days the password is valid. Valid values are 0–90. The default is 90.
- Automatically reset password after it expires: Select whether to reset the password automatically when it expires. The default is OFF. If you don’t enable this field, users can’t open the app after their passwords expire.
To configure a new app connector
- In the App Information page, select Create a new connector. The app connector fields appear.
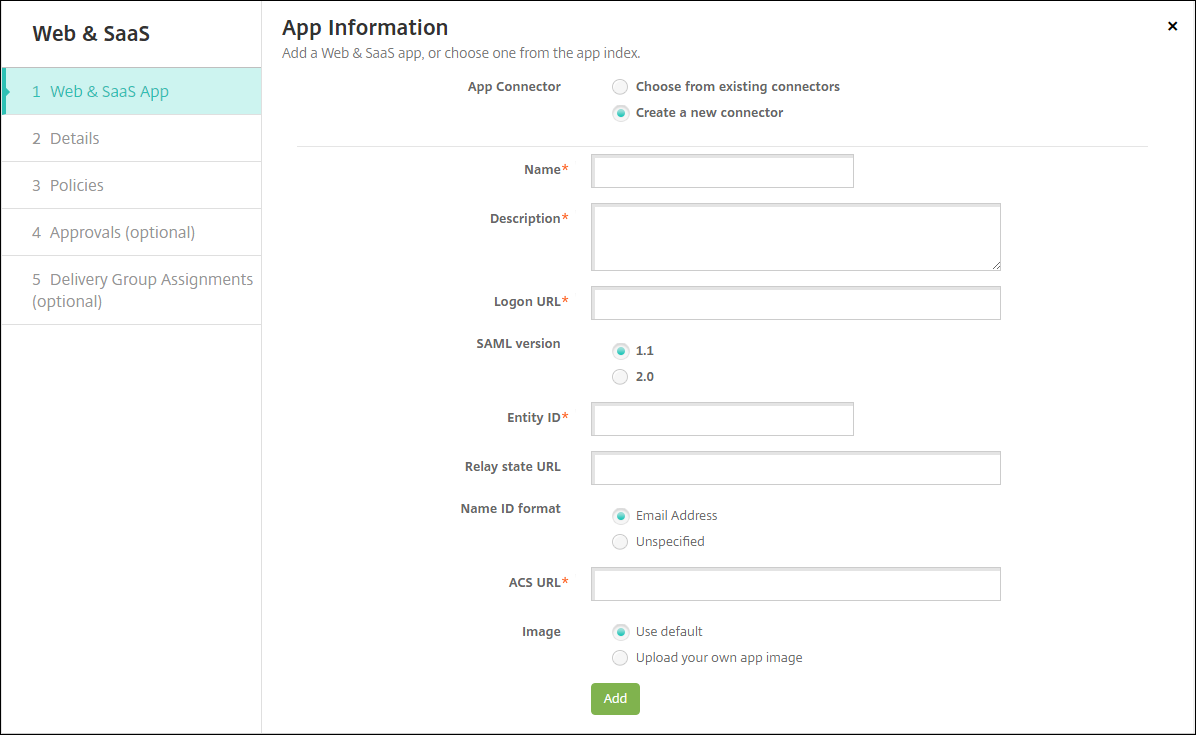
- Configure these settings:
- Name: Type a name for the connector. This field is required.
- Description: Type a description for the connector. This field is required.
- Logon URL: Type, or copy and paste, the URL where users log on to the site. For example, if the app you want to add has a logon page, open a web browser and go to the logon page for the app. For example, it might be https://www.example.com/logon . This field is required.
- SAML version: Select either 1.1 or 2.0. The default is 1.1.
- Entity ID: Type the identity for the SAML app.
- Relay state URL: Type the web address for the SAML application. The relay state URL is the response URL from the app.
- Name ID format: Select either Email Address or Unspecified. The default is Email Address.
- ACS URL: Type the Assertion Consumer Service URL of the identity provider or service provider. The ACS URL gives users SSO capability.
- Image: Select whether to use the default Citrix image or to upload your own app image. The default is Use default.
- To upload your own image, click Browse and navigate to the file location. The file must be a .PNG file. You can’t upload a JPEG or GIF file. When you add a custom graphic, you can’t change it later.
- When you’re finished, click Add. The Details page appears.
- Click Next. The App Policy page appears.
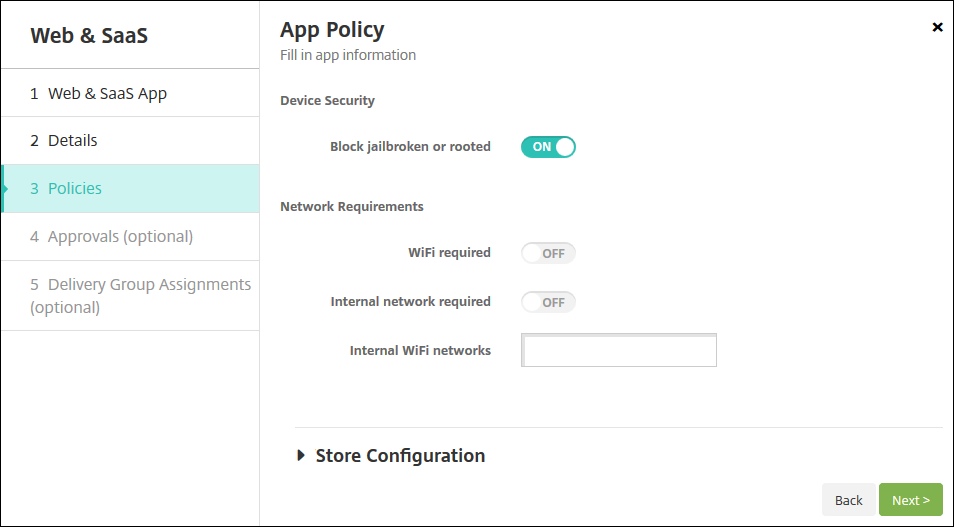
- Configure these settings:
- Device Security
- Block jailbroken or rooted: Select whether to block jailbroken or rooted devices from accessing the app. The default is ON.
- Network Requirements
- WiFi required: Select whether a Wi-Fi connection is required to run the app. The default is OFF.
- Internal network required: Select whether an internal network is required to run the app. The default is OFF.
- Internal WiFi networks: If you enabled Wi-Fi required, type the internal Wi-Fi networks to use.
- Configure the deployment rules. For information, see Deployment rules.
- Expand Store Configuration.

- App FAQ: Click Add a new FAQ question and answer to create a FAQ for the app.
- Add screenshots for phones/tablets: Add screen captures that appear in the app store.
- Allow app ratings: Allow users to rate the app in the app store.
- Allow app comments: Allow users to leave comments on the app in the app store.
- Click Next. The Approvals page appears.
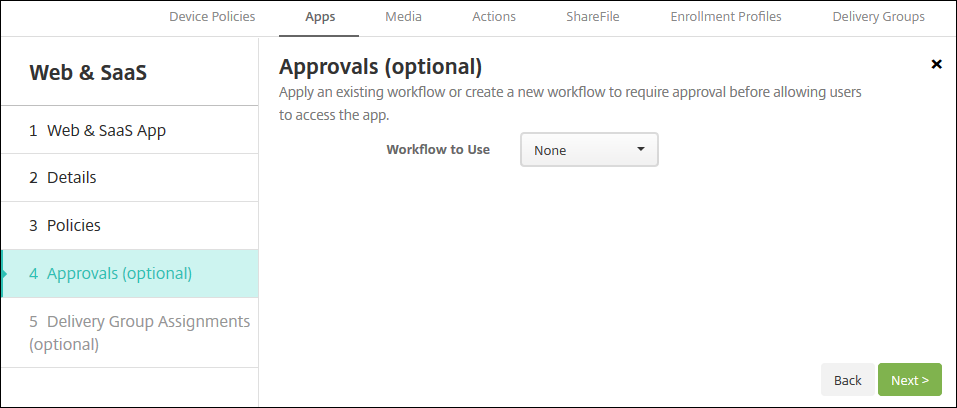 To use workflows to require approval before allowing users to access the app, see Apply workflows.
- Click Next. The Delivery Group Assignment page appears.
- Next to Choose delivery groups, type to find a delivery group or select a group or groups. The groups you select appear in the Delivery groups to receive app assignment list.
- Expand Deployment Schedule and then configure the following settings:
- Deploy: Choose whether to deploy the app to devices. The default is On.
- Deployment schedule: Choose whether to deploy the app Now or Later. If you select Later, configure a date and time to deploy the app. The default is Now.
- Deployment condition: Choose On every connection to deploy the app every time the device connects. Choose Only when previous deployment has failed to deploy the app when the device failed to receive the app previously. The default is On every connection.
The Deploy for always-on connection applies when you have configured the scheduling background deployment key in Settings > Server Properties.
The deployment schedule that you configure is the same for all platforms. Any changes you make apply to all platforms, except for Deploy for always-on connection.
Add an enterprise app
Enterprise apps in XenMobile represent native apps that are not prepared with the MAM SDK or MDX Toolkit. Those apps don’t contain the policies associated with MDX apps. You can upload an enterprise app on the Apps tab in the XenMobile console. Enterprise apps support the following platforms (and corresponding file types):
- iOS (.ipa file)
- Android (.apk file)
- Samsung Knox (.apk file)
- Android Enterprise (.apk file)
- See also: MDX-enabled private apps
Adding apps downloaded from the Google Play store as enterprise apps is not supported. Add apps from the Google Play store as public app store apps instead. See Add a public app store app.
- In the XenMobile console, click Configure > Apps > Add. The Add App dialog box appears.

- Click Enterprise. The App Information page appears.
- On the App Information pane, type the following information:
- Name: Type a descriptive name for the app. This name is listed under App Name on the Apps table.
- Description: Type an optional description of the app.
- App category: Optionally, in the list, click the category to which you want to add the app. For more information about app categories, see About app categories.
- Click Next. The App Platforms page appears.
- Under Platforms, select the platforms you want to add. If you are only configuring for one platform, clear the others.
- For each platform you chose, select the file to upload by clicking Upload and navigating to the file location.
- Click Next. The app information page for the platform appears.
- Configure the settings for the platform type, such as:
- File name: Optionally, type a new name for the app.
- App description: Optionally, type a new description for the app.
- App version: You can’t change this field.
- Minimum OS version: Optionally, type the oldest operating system version that the device can run to use the app.
- Maximum OS version: Optionally, type the most recent operating system that the device must run to use the app.
- Excluded devices: Optionally, type the manufacturer or models of devices that cannot run the app.
- Package ID: Unique identifier of your app.
- Remove app if MDM profile is removed: Select whether to remove the app from a device when the MDM profile is removed. The default is On.
- Prevent app data backup: Select whether to prevent the app from backing up data. The default is On.
- Force app to be managed: If you are installing an unmanaged app, select On if you want users on unsupervised devices to be prompted to allow management of the app. If they accept the prompt, the app is managed.
- Configure the deployment rules. For information, see Deployment rules.
- Expand Store Configuration.

- App FAQ: Click Add a new FAQ question and answer to create a FAQ for the app.
- Add screenshots for phones/tablets: Add screen captures that appear in the app store.
- Allow app ratings: Allow users to rate the app in the app store.
- Allow app comments: Allow users to leave comments on the app in the app store.
- Click Next. The Approvals page appears. To use workflows to require approval before allowing users to access the app, see Apply workflows. If you don’t need an approval workflow, continue to the next step.
- Click Next. The Delivery Group Assignment page appears.
- Next to Choose delivery groups, type to find a delivery group or select a group or groups in the list. The groups you select appear in the Delivery groups to receive app assignment list.
- Expand Deployment Schedule and then configure the following settings:
- Deploy: Choose whether to deploy the app to devices. The default is On.
- Deployment schedule: Choose whether to deploy the app Now or Later. If you select Later, configure a date and time to deploy the app. The default is Now.
- Deployment condition: Choose On every connection to deploy the app every time the device connects. Choose Only when previous deployment has failed to deploy the app when the device failed to receive the app previously. The default is On every connection.
The Deploy for always-on connection applies when you have configured the scheduling background deployment key in Settings > Server Properties.
The deployment schedule that you configure is the same for all platforms. Any changes you make apply to all platforms, except for Deploy for always-on connection.
Add a Web link
A web link is a web address to an internet or intranet site. A web link can also point to a web application that doesn’t require SSO. After you finish configuring a web link, the link appears as an icon in the app store. When users log on with Secure Hub, the link appears with the list of available apps and desktops.
You can configure web links from the Apps tab in the XenMobile console. When you finish configuring the web link, the link appears as a link icon in the list in the Apps table. When users log on with Secure Hub, the link appears with the list of available apps and desktops.
To add the link, you provide the following information:
- Name for the link
- Description of the link
- Web address (URL)
- Category
- Role
- Image in .png format (optional)
- In the XenMobile console, click Configure > Apps > Add. The Add App dialog box appears.

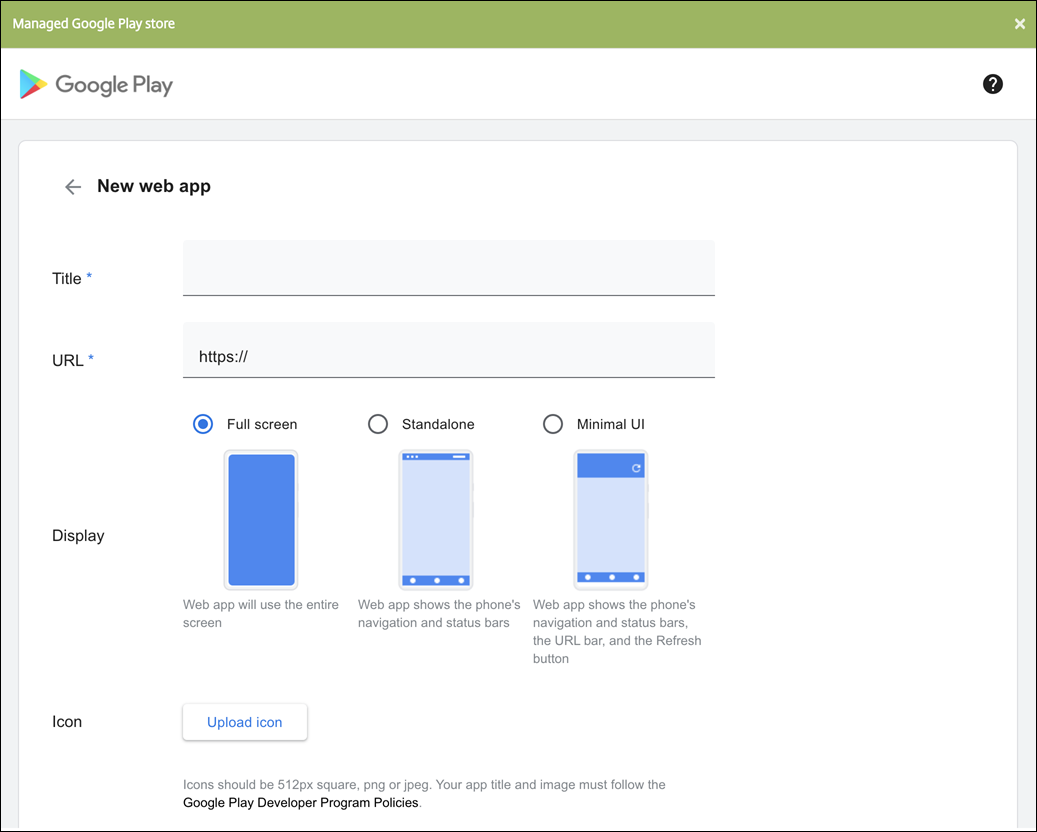
- Click Web Link. The App Information page appears.
- On the App Information pane, type the following information: Name: Type a descriptive name for the app. This name is listed under App Name on the Apps table. Description: Type an optional description of the app. App category: Optionally, in the list, click the category to which you want to add the app. For more information about app categories, see About app categories.
- Click Next. The App Platforms page appears.
- Under Platforms, select Other platforms to add a web app for iOS and Android (legacy DA), or select Android Enterprise. Clear the checkbox that you don’t want to add.
- For platforms other than Android Enterprise, configure these settings:
- App name: Accept the pre-filled name or type a new name.
- App description: Accept the pre-filled description or type one of your own.
- URL: Accept the pre-filled URL or type the web address for the app. Depending on the connector you choose, this field may contain a placeholder that you must replace before you can move to the next page.
- App is hosted in internal network: Select whether the app is running on a server in your internal network. If users connect from a remote location to the internal app, they must connect through Citrix Gateway. Setting this option to ON adds the VPN keyword to the app and allows users to connect through Citrix Gateway. The default is OFF.
- App category: In the list, click an optional category to apply to the app.
- Image: Select whether to use the default Citrix image or to upload your own app image. The default is Use default.
- To upload your own image, click Browse and navigate to the file location. The file must be a .PNG file. You can’t upload a JPEG or GIF file. When you add a custom graphic, you can’t change it later.
- Configure the deployment rules. For information, see Deployment rules.
- Expand Store Configuration.
- App FAQ: Click Add a new FAQ question and answer to create a FAQ for the app.
- Add screenshots for phones/tablets: Add screen captures that appear in the app store.
- Allow app ratings: Allow users to rate the app in the app store.
- Allow app comments: Allow users to leave comments on the app in the app store.
- Click Next. The Delivery Group Assignment page appears.
- Next to Choose delivery groups, type to find a delivery group or select a group or groups in the list. The groups you select appear in the Delivery groups to receive app assignment list.
- Expand Deployment Schedule and then configure the following settings:
- Deploy: Choose whether to deploy the app to devices. The default is On.
- Deployment schedule: Choose whether to deploy the app Now or Later. If you select Later, configure a date and time to deploy the app. The default is Now.
- Deployment condition: Choose On every connection to deploy the app every time the device connects. Choose Only when previous deployment has failed to deploy the app when the device failed to receive the app previously. The default is On every connection.
The Deploy for always-on connection applies when you have configured the scheduling background deployment key in Settings > Server Properties.
The deployment schedule that you configure is the same for all platforms. Any changes you make apply to all platforms, except for Deploy for always-on connection.
Enable Microsoft 365 apps
You can open the MDX container to allow Secure Mail, Secure Web, and Citrix Files to transfer documents and data to Microsoft Office 365 apps. For details, see Allowing Secure Interaction with Office 365 Apps.
Apply workflows
Configure these settings to assign or create a workflow:
- Workflow to Use: In the list, click an existing workflow or click Create a new workflow. The default is None. If you select Create a new workflow, configure these settings.
- Name: Type a unique name for the workflow.
- Description: Optionally, type a description for the workflow.
- Email Approval Templates: In the list, select the email approval template to be assigned. When you click the eye icon to the right of this field, a dialog box appears where you can preview the template.
- Levels of manager approval: In the list, select the number of levels of manager approval required for this workflow. The default is 1 level. Possible options are:
- Not Needed
- 1 level
- 2 levels
- 3 levels
- Click Search to see a list of all the persons in the selected domain.
- Type a full or partial name in the search box, and then click Search to limit the search results.
- Persons in the Selected additional required approvers list have check marks next to their name in the search results list. Scroll through the list and clear the checkbox next to each name you want to remove.
App store and Citrix Secure Hub branding
You can set how apps appear in the store and add a logo to brand Secure Hub and the app store. These branding features are available for iOS and Android devices.
Before you begin, make sure you have your custom image ready and accessible.
The custom image must meet these requirements:
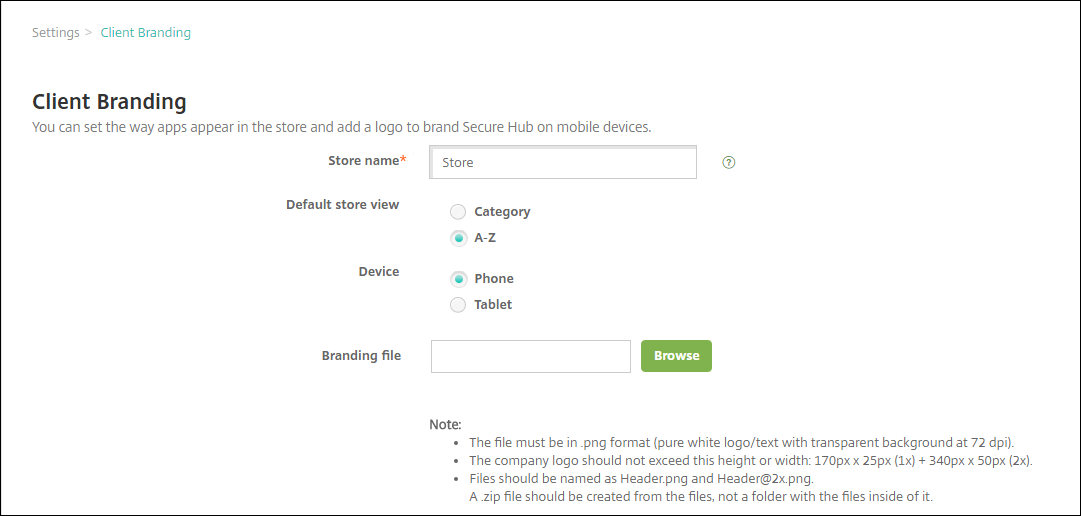
- The file must be in .png format
- Use a pure white logo or text with a transparent background at 72 dpi.
- The company logo should not exceed this height or width: 170 px x 25 px (1x) and 340 px x 50 px (2x).
- Name the files as Header.png and Header@2x.png .
- Create a .zip file from the files, not a folder with the files inside it.
- In the XenMobile Server console, click the gear icon in the upper-right corner. The Settings page appears.
- Under Client, click Client Branding. The Client Branding page appears. Configure the following settings:
- Store name: The store name appears in the user’s account information. Changing the name also changes the URL used to access store services. You typically do not need to change the default name.
Important: The Store name can only contain alphanumeric characters.
The official version of this content is in English. Some of the Cloud Software Group documentation content is machine translated for your convenience only. Cloud Software Group has no control over machine-translated content, which may contain errors, inaccuracies or unsuitable language. No warranty of any kind, either expressed or implied, is made as to the accuracy, reliability, suitability, or correctness of any translations made from the English original into any other language, or that your Cloud Software Group product or service conforms to any machine translated content, and any warranty provided under the applicable end user license agreement or terms of service, or any other agreement with Cloud Software Group, that the product or service conforms with any documentation shall not apply to the extent that such documentation has been machine translated. Cloud Software Group will not be held responsible for any damage or issues that may arise from using machine-translated content.
DIESER DIENST KANN ÜBERSETZUNGEN ENTHALTEN, DIE VON GOOGLE BEREITGESTELLT WERDEN. GOOGLE LEHNT JEDE AUSDRÜCKLICHE ODER STILLSCHWEIGENDE GEWÄHRLEISTUNG IN BEZUG AUF DIE ÜBERSETZUNGEN AB, EINSCHLIESSLICH JEGLICHER GEWÄHRLEISTUNG DER GENAUIGKEIT, ZUVERLÄSSIGKEIT UND JEGLICHER STILLSCHWEIGENDEN GEWÄHRLEISTUNG DER MARKTGÄNGIGKEIT, DER EIGNUNG FÜR EINEN BESTIMMTEN ZWECK UND DER NICHTVERLETZUNG VON RECHTEN DRITTER.
CE SERVICE PEUT CONTENIR DES TRADUCTIONS FOURNIES PAR GOOGLE. GOOGLE EXCLUT TOUTE GARANTIE RELATIVE AUX TRADUCTIONS, EXPRESSE OU IMPLICITE, Y COMPRIS TOUTE GARANTIE D'EXACTITUDE, DE FIABILITÉ ET TOUTE GARANTIE IMPLICITE DE QUALITÉ MARCHANDE, D'ADÉQUATION À UN USAGE PARTICULIER ET D'ABSENCE DE CONTREFAÇON.
ESTE SERVICIO PUEDE CONTENER TRADUCCIONES CON TECNOLOGÍA DE GOOGLE. GOOGLE RENUNCIA A TODAS LAS GARANTÍAS RELACIONADAS CON LAS TRADUCCIONES, TANTO IMPLÍCITAS COMO EXPLÍCITAS, INCLUIDAS LAS GARANTÍAS DE EXACTITUD, FIABILIDAD Y OTRAS GARANTÍAS IMPLÍCITAS DE COMERCIABILIDAD, IDONEIDAD PARA UN FIN EN PARTICULAR Y AUSENCIA DE INFRACCIÓN DE DERECHOS.
本服务可能包含由 Google 提供技术支持的翻译。Google 对这些翻译内容不做任何明示或暗示的保证,包括对准确性、可靠性的任何保证以及对适销性、特定用途的适用性和非侵权性的任何暗示保证。
このサービスには、Google が提供する翻訳が含まれている可能性があります。Google は翻訳について、明示的か黙示的かを問わず、精度と信頼性に関するあらゆる保証、および商品性、特定目的への適合性、第三者の権利を侵害しないことに関するあらゆる黙示的保証を含め、一切保証しません。
ESTE SERVIÇO PODE CONTER TRADUÇÕES FORNECIDAS PELO GOOGLE. O GOOGLE SE EXIME DE TODAS AS GARANTIAS RELACIONADAS COM AS TRADUÇÕES, EXPRESSAS OU IMPLÍCITAS, INCLUINDO QUALQUER GARANTIA DE PRECISÃO, CONFIABILIDADE E QUALQUER GARANTIA IMPLÍCITA DE COMERCIALIZAÇÃO, ADEQUAÇÃO A UM PROPÓSITO ESPECÍFICO E NÃO INFRAÇÃO.


 To use workflows to require approval before allowing users to access the app, see Apply workflows. If you don’t want to set up approval workflows, continue with the next step.


 To use workflows to require approval before allowing users to access the app, see Apply workflows.


 Configure these settings: